
Table of Contents
How to Ensure 100% Stitch Accuracy for Hats & Caps Embroidery Digitizing?
Custom embroidered caps are a great way to express yourself and show off your personal style, while also offering a powerful platform for businesses to showcase their presence . However, the caps inherent curvature demands a specialized approach to embroidery to prevent common imperfections. Consequently, accurate hat embroidery digitizing forms the cornerstone of high-quality results. This crucial initial process directly dictates the final stitched outcome. This blog post guides you in achieving absolute precision in caps embroidery digitizing, ensuring exceptional quality and solidifying a businesss reputation.
What Really Gets Tricky in Professional Embroidery Digitizing?
The rigid, curved surface of a cap fundamentally changes how stitches lay, making it one of the main hurdles in cap embroidery digitizing service. Here are some of the specific challenges digitizers face every day.
Curved Surface Compensation and Pull Dynamics
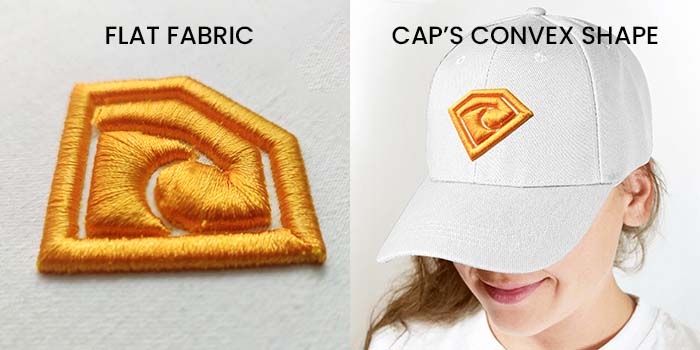
Managing the curved surface of a cap is arguably the toughest part of digitizing. On flat items, fabric stays consistent, but a cap’s convex shape directly impacts thread tension. This results in the tightest stitching resistance at the buckram-reinforced center seam and the loosest on the caps sides. Because of this uneven tension, simply using standard pull compensation settings designed for flat apparel will cause significant gaps and fabric exposure on caps. Digitizers must instead increase pull compensation and widen column stitches to ensure complete visual coverage. Additionally, the cap’s curve visually compresses stitches, making them appear narrower than they truly are.
Center Seam Navigation and Needle Deflection
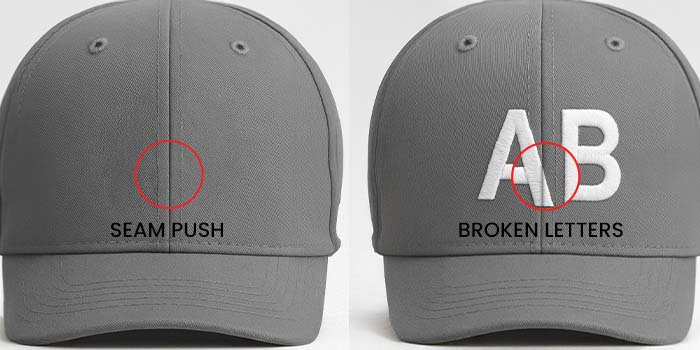
The thick, hard center seam on a standard 6-panel cap actively deflects the embroidery needle, creating significant registration problems. As the needle tries to penetrate the multi-layered seam, the seam pushes it off its intended path. This deflection causes a visible split down the middle of any design element that crosses the seam, making letters appear broken or misaligned. The seams density also compounds this problem; it leads to frequent thread and needle breaks, halting hat embroidery digitizing and potentially damaging materials.
Stabilization and hooping
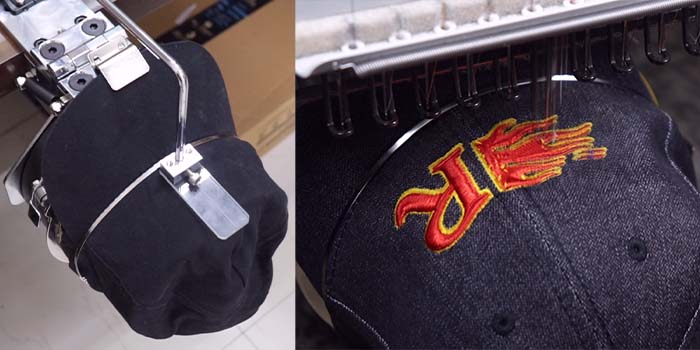
Caps present inherent construction limits for stabilizer size and hoop contact. Because of this, relying on specialized cap tear-away, adhesive stabilizers, and increased frame tension becomes crucial. These methods actively prevent slippage, flagging, and puckering, issues far less common on flat garments that allow for more generous cut-away stabilizers. Therefore, best practices for embroidery digitizing must employ effective practices. They double tear-away for unstructured or mesh caps, use sticky-back or temporary spray adhesive, flip the sweatband out, and perform tension checks—like the famous "pen trick"—to ensure the caps crown remains perfectly drum-tight and centered.
Tackling 3D Puff
Indeed, this presents another significant hurdle for custom embroidered caps. Tackling 3D puff embroidery digitizing on a curved crown brings additional challenges like foam handling to all existing cap constraints. It demands color-matched foam, higher stitch density to properly compress the foam on curves, precise corner-capping strokes, and limited satin spans. These techniques actively prevent unsightly dimples and exposed foam, especially when designs approach the caps seam. Professionals strictly follow robust workflows. These include pause codes for accurate foam placement, tack stitches to securely trap the foam, dense edge caps to cleanly cut the urethane material, and careful cleanup. This meticulous process ensures the raised effect remains crisp and prominent on the caps dome.
Quick Tips for perfect stitches in Hat embroidery digitizing
Here are our best suggestions for conquering these hurdles and achieving absolute precision.
Adjust Your Digitizing for Curved Surfaces
When you work on the curved surface of custom embroidered caps, make sure you tweak your digitizing settings specifically for that shape. Remember that standard settings will often under-compensate for the dome’s pull. This causes gaps and shape distortion. Increase pull compensation significantly beyond typical baselines. This helps you close gaps and maintain the true shape of the cap. Also, widen satin columns slightly for full coverage and to prevent fabric show-through. Adjust stitch angles so fills and satins cross the curve, which balances distortion across your design. Employ strategic underlays, like a diagonal tatami, when performing hat embroidery digitizing. This prevents designs from appearing stretched.
Implement Optimal Hooping Techniques
Proper hooping is absolutely fundamental for you to prevent movement and ensure precision. Use dedicated cap frames for effective hooping. These tools give you the best grip. Always flip the sweatband out of the sewing area. This keeps it clear of the needle. For unstructured or mesh caps, use a two-piece tear-away stabilizer for crucial support. Tighten the cap frame precisely to flatten the crown without overstretching it. Verify tension using the "pen trick." This confirms even tension across the crown, preventing slippage and registration issues.
Balance Design Size and Stitch Density
Effectively For professional embroidery digitizing on caps, you have to strike a smart balance between design detail and stitch density due to the limited space. Recognize the limited vertical sew field on caps. This requires careful planning for intricate designs. Balance design detail with stitch density. Fine text that looks sharp on flat fabrics often blurs on caps. Target a slightly lower stitch density for clarity. This prevents puckering and distortion. Maintain minimum stroke widths. This ensures your designs remain crisp and legible at cap-scale. Simplify complex artwork. This prevents overloading stitches.
Final Thoughts
So, when you get right down to it, getting a perfect stitch on caps is a real challenge, but the payoff for both style and branding is huge. It all comes down to mastering the hurdles with a great cap embroidery digitizing Service.To get that level of detail, you need professional embroidery digitizing. At Cre8iveSkill, thats exactly what we deliver, helping brands and individuals get perfect, high-quality results for all their cap and hat needs.