
Table of Contents
How to Design Graphics as Per Printful Embroidery Guidelines?
What Is Graphic Design?
In its simplest explanation, graphic design is the art of communicating messages. But not just any kind! The communication medium is pictures and symbols.
If you ask most people, they will say that graphic design is a modern concept. While the term may have been coined as recently as the 1920s, the truth is that graphic design traces its origins all the way back to before humans used language for communication.
Remember the Egyptian hieroglyphs or the cave paintings were still discovering today? Theyre all excellent examples of art with a purpose—communication.
Where Can It Be Used?
Since graphic design communicates ideas or messages using a visual medium, it can be used everywhere—from something as simple as a business logo to something as complex as page layouts on a magazine or a website. This is why the graphic design industry is huge!
Whether its signages or motion pictures, the garment industry or packaging, digital mediums like web and mobile design and software interfaces or print form like book covers, product labels, infographics—the list are never-ending!
What Does Cre8iveSkill Do?
Crea8iveSkill provides design services. More specifically, we are a one-stop solution to all your embroidery and vector art needs—be it digitizations, conversions, illustrations, and vector design services.
Our Speciality
Designing Graphic for Embroidery
While graphic design use is widespread, most people are under the impression that one art form can be used across several mediums. Confusing? Lets simplify that! A graphic art file of a business logo in a JPG or PNG file cannot be used for another medium like, say, embroidery.
Desktop graphic design software platforms such as MS Paint, MS Powerpoint, Adobe Photoshop, etc., do not have the format required to be used for digitized embroidery. This is where specialized software similar to AutoCad like MyEditor, DRAWings PRO X, BES Embroidery Software, or Amazing Designs-Digitize N Stitch come into play. What Does This Kind of Software Do?
Embroidery software performs all functions related to graphics design for embroidery. It allows creators to make their designs from scratch, for instance. You can also transform and edit shapes and add text where necessary. Other options that embroidery software offers include dropping names, cutting, stitch editor, color change, creating embroidery files, and so much more. This is why using embroidery-specific software results in stunning designs.
But many people dont use embroidery software for their designs. A business might have a graphic designer work on their logo for print or business cards, perhaps even a website. But to embroider that logo on official t-shirts or caps, the image file needs to be converted into stitch files with specialized embroidery digitizing software. Heres a list of whats available:
Embroidery digitizing software includes vectorizer tools that help convert vector drawings into embroidery designs and vice versa. A vectorizer is essential as it helps determine the stitch type and object type for each given shape.
Auto-Digitizing
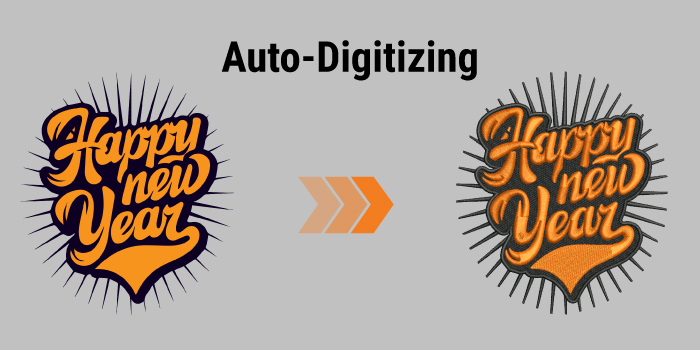
Auto-digitizing offers design professionals control over conversion settings that support functions such as recognizing shapes in vector, artwork, or bitmap. Design professionals depend extensively on digitizers to increase the accuracy of design structures from raster or vector images. It works by generating stitch representations. Since the text is included in graphic designs, professionals need to optimize stitch fonts via lettering features. As is evident, digitizing software for embroidery works differently and requires a unique skill set to produce these designs. The software works by taking graphic designs and creating X and Y-axis paths. It then generates stitches and stitch points that embroidery machines can read. These guidelines help the embroidery machines place stitches and make a stitched design on a given fabric.
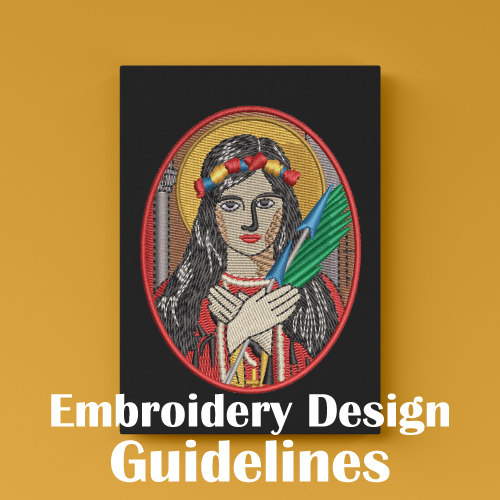
Printful Embroidery Design Guidelines
When designing for embroidery, a design professional needs to work within set guidelines to ensure that the graphic can be successfully translated to embroidery.
If youre interested in designing graphics for embroidery, here is a list of technical specifications to remember:
In General
The text should be a minimum of 0.25 tall and at least 0.05 thick
The width of the stitch should be a minimum of 0.16".
The outlined text should be a minimum of 0.5" tall
Large fill areas should be avoided on lightweight garments.
Shadows and blending are challenging to reproduce for small designs Vector-based EPS files are the ideal format when providing artwork to an embroidery company like Printfull
The larger and cleaner the file, the better the final result—use 300 DPI images
For Polos
For pique (not jersey) knits 0.25 text is recommended
The standard size for a front logo design is 2.5" to 4" wide x 1" to 2" tall
For more prominent size logos, try the sleeve or back yoke area as you can go as large as 5" wide and 3" tall
For Caps
The text should be a minimum of 0.25 tall
The maximum size for the front is between 4" - 5.5" wide and 1.75" - 2" tall, depending on the style of hat (beanie, high profile, and low profile
The maximum size for the side embroidery on a cap is 2" x 1", and 10 characters per line
Create Embroidery Designs from Artwork
Artwork is breathtaking and often very complicated to replicate in embroidery. Too many tiny colors can lead to several thread knots at the back, blurred lines, fabric stretching, and even needle breaking. Use embroidery-specific software to convert complex designs into simple digitized files. You can also reduce the number of threads and colors to ensure the best output. Should you need help, our design services team is more than happy to work on your graphic design.
Graphic Designing for Embroidery: Things To Remember
Digitization
Embroidery designs follow a different process than printing. This is why files must be converted to a specific embroidery format, a vector file preferably in AI, PDF, or EPS formats. This is called file digitization. If you dont have provisions for these, a high-resolution PNG file will also work. A nominal one-time fee is charged for embroidery format conversion and file digitization by Printful.
Image Size
Images selected by you need to fit within a resolution range of 150 DPI and 300 DPI. Uploading bigger files or re-sizing low-quality photos will not help create a good design. The image will either blur or will have jagged edges, giving an unsatisfactory result.
Minimalist While computers can duplicate complex designs with multiple colors and transparent effects, that is not the case with embroidery machines and threads. It is best to follow a minimalist approach with embroidery—solid background with a simple logo or design. Youll get tight lines and a polished look.
Limited Colors
Less is better in this case, too. The fewer your color choices, the more polished the end design will be. Printful offers fifteen colors but limits selection of up to six colors per design, irrespective of embroidery type.
Symmetry
Placement of embroidery designs on custom clothing, be it hats, polo shirts, jackets, bags, etc., is critical. It will be counterproductive to have an embroidered patch that is lopsided. Center your design in Printfuls embroidery template and ensure that you span out equally in both directions from there. If you are worried about the actual result, get Printfuls embroidery samples before ordering in bulk.
Backgrounds
When we say backgrounds, we mean both—large filled areas behind your design and transparent or blank space. Large filled areas could be one solid color as well as multiple colors and patterns. Embroidery designs usually have a maximum of 15,000 stitches. Having either kind of filled background will consume a lot of your available stitch count. It will also increase the cost of your embroidery design order. Avoid backgrounds as much as possible or crop out whatever is not integral to your design. When working with large, transparent spaces, ensure your image is placed correctly. Dont center a small design with spaces between elements—crop and stretch the image to fill the maximum permitted area. If you have a lot of text or design with narrow negative spaces in between, fill them with color so that your design pops.
Printfuls Specifications
Printful is a Print-On-Demand company through which you can express your ideas and creativity in vibrant thread colors. Whether youre embroidering polos, sweatshirts, bodysuits, bibs, bottoms, jackets, bags, and hats for personal use, gifting purposes, or for your business or online garment store, Printful is your go-to creative partner.
Before submitting your graphic designs to Printful, you need to understand a few basics. Ensuring familiarity with the guidelines below will help you create or design graphical images suitable for embroidery file digitizing by Printful.
Embroidery Type
While there are several types of commercial embroidery, Printful offers the three most popular kinds—standard, 3D Puff Embroidery, and a Partial 3D Puff.
Flat Embroidery
As the name suggests, this is a simple embroidery style as threads are placed directly on the fabric, giving it a very flat appearance. This kind of embroidery is most commonly used on polos, hats, jackets, sweatshirts, etc. Flat embroidery is more suitable for designs that call for delicate work—thin strokes and less space between design elements.
3D Puff Embroidery
This kind of embroidery is used to give a pop-up appearance to embroidery designs. Typically, a layer of foam or fabric is added under the threads to provide it with the lift necessary to be a 3D Puff design. This kind of embroidery work is excellent for larger designs that need a more dramatic effect.
Partial 3D Puff
This is a combination of both flat and 3D puff embroidery styles. Areas selected by you as 3D will use the puff method whereas, the other design elements will remain flat.
Stitch Type
The three most popular stitch types Printful offers are Satin, Run, and Tatami fill.
Heres a guide to help you pick the best stitch to suit your design
A minimum thickness of 0.05″ (1.3 mm) for shapes works best if you want flat embroidery
If you wish to do a 3D Puff, please ensure that the thickness is between 0.2″ (5 mm) and 0.5″ (12.5 mm). Do also remember to leave a space of at least 0.07″ (1.8 mm) between 3D objects.
Satin stitch is used for shapes that range from 0.05″ to 0.5″ while tatami stitch works better for forms that go beyond 0.5″ (12.5 mm)
With over 25 years of experience in the vector artwork and embroidery digitizing industry, Cre8iveSkill has successfully served some top brands, suppliers, and distributors. Our extensive vector art expertise makes us the ideal vendor for all your day-to-day vector artwork and digitizing needs. More specifically, our most trained and talented operators and design professionals work on graphics designing for embroidery day in and out, putting our design services on par with Printfuls design services.