
Essential Guide to Underlay Stitches for Embroidery Digitizing Service
Embroidery DigitizingWhen discussing machine embroidery, underlay stitches are like the steady beat in a catchy song that keeps everything in sync. They work quietly in the background to hold every detail of the design together, ensuring each stitch lands exactly where it should. Without that dependable beat, the embroidery may lose its crispness and look off, much like a tune without a clear rhythm. By ensuring a reliable base, these sewn layers give your artwork the strength and clarity it deserves, turning a good design into a truly great one.
What Are Underlay Stitches? A Simple Breakdown
Just like a skeleton supports the body, these foundation threads provide structure to your design, securing the fabric to the stabilizer and keeping it from puckering or shifting. Achieving professional-quality embroidery depends on precise underlay placement, which helps reduce the push-pull effect, keeps designs properly aligned, and ensures a flawless finish. Software like Hatch Embroidery, Tajima Pulse, Melco Design Shop, and Wilcom streamlines the process by auto-applying underlay based on fabric and design size, offering digitizers an easy way to tweak designs without starting from scratch.
While top stitches create the final look, underlay stitches work quietly underneath, adding support without being visible. Their parameters, such as stitch length and density, are set precisely to add stability while keeping the designs appearance intact. That’s why professional embroidery digitizing service always prioritizes the correct type of underlay to ensure the best results.
Breaking Down the Types of Underlay Stitches.
A) Edge Run Underlay Stitches:
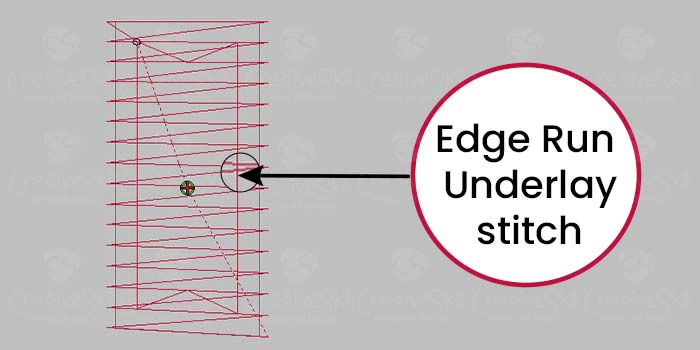
The type is most beneficial when the column stitch increases in width, generally between 2.5mm and 3.5 mm. By following a defined indentation along the outer contour, the edge run helps secure cover stitches and enhances the edges’ overall quality. You’ll usually find the inset about 0.4mm to 0.6mm from the edge, though it may vary depending on the material.
When applied correctly, the edge run keeps the borders of machine embroidery patterns firm and smooth on various materials like cotton blends, golf shirts, and knit fabrics, including T-shirts, polos, and jerseys. Top-tier Embroidery Digitizing Service use this underlay type to improve design definition.
B) Fill Underlay Stitches:
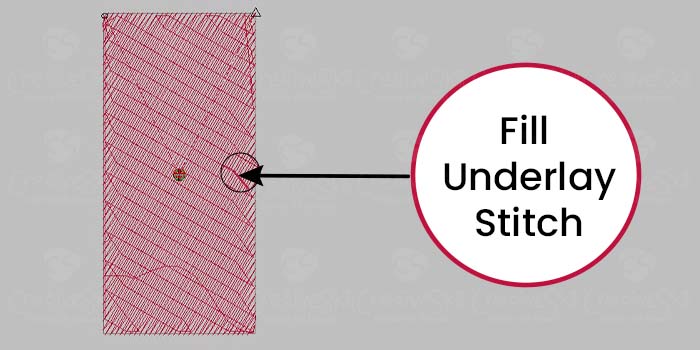
When your are dealing with areas of your design that have a lot of dense, filled-in stitching, fill is particularly useful. It lays down in a back-and-forth motion, running against the direction of the fill stitch. Because of its lower density, the underlay is stitched in a direction that opposes the topstitching.
C) Center Run Underlay Stitches :

This underlay is sometimes known as perpendicular or center-walk underlay in different embroidery digitizing service and software. It adds a straight stitch to the center of a satin column, helping small text stay sharp while minimizing excess fabric buildup. To keep the top layer stable, you may have to run the centerline underlay 2-3 times, depending on the fabric you’re using. It’s most useful for small text, fine details, and monograms, especially when dealing with very thin satin columns or motif elements.
D) Zig-Zag Underlay Stitches:
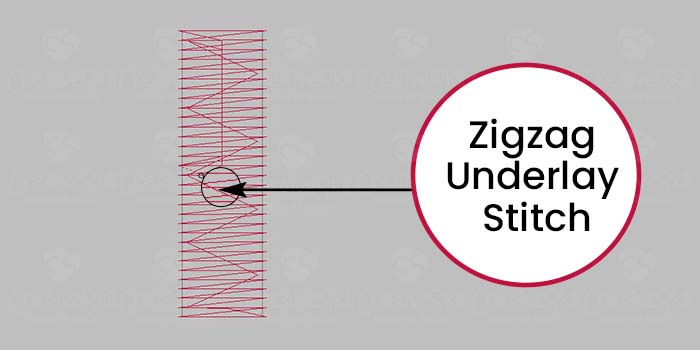
Unlike a basic parallel underlay, a zigzag underlay moves down the column and then back up, effectively doubling the stitch count. This approach keeps the density low while placing widely spaced, long sewing lines under the satin column. By lifting the cover patterns, this method adds depth to the design. If you look closely, you’ll see the stitch angles are nearly 45 degrees. The diagonal, back-and-forth motion adds volume, making it a must for embroidery that needs a lifted, 3D effect, like puff embroidery.
E) Double Zigzag Underlay Stitches:
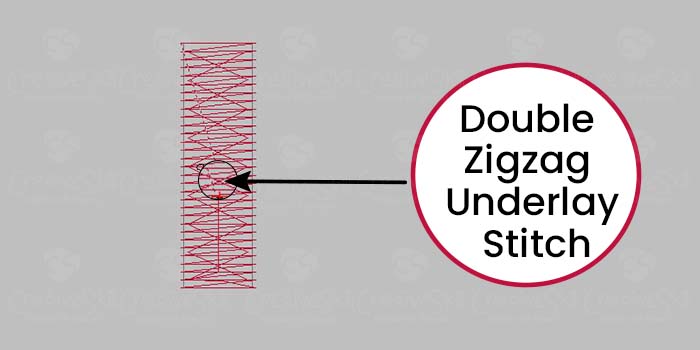
A denser take on zigzag, these underlay stitches form a diamond pattern as the stitches overlap in opposite directions. The crisscross diamond design enhances coverage and stability, helping top stitches stay in place on plush materials like terry cloth.
F) Lattice Underlay Stitches (Also Known as Net or Grid Underlay) :
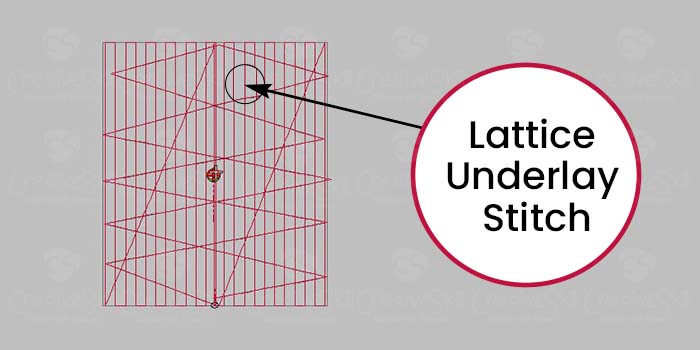
Similar to tatami but with a lighter touch, it creates a delicate grid that serves as a subtle yet sturdy base. It controls fabric pull and keeps the thread work neat and secure, which is important for bordered outlines. A double layer of lattice underlay has two tightly spaced zigzag base threads that provide strong support for the heavy satin stitches in the final result.
When Underlay Stiches are Matter Most?
A) Large and Textured Embroidery:
Using the proper structural layer is important when working on big and specific styles. Just imagine working on a complicated, formidable layout, consisting of a college mascot, on an undeniable cotton tee. Without the right foundation, dense stitching can effortlessly stress and warp sensitive cotton fabric. The intricate information and dense fills of the mascot could cause the fabric to pucker and warp, making it look sloppy and unbalanced.
That’s where the right underlay—like a zigzag in this case—makes all the difference. It stabilizes the cotton, prevents distortion, and helps the top stitches sit smoothly, resulting in clean, professional-quality embroidery. At Cre8iveSkill, we understand how critical proper underlay choices are, and our expert digitizing team ensures every design is built on a solid foundation—so your final embroidery looks sharp, polished, and ready to impress.
B)Stitch Support for Low-Quality or Loosely Woven Fabrics:
Materials that are low in quality or loosely woven tend to be unstable and can easily stretch, distort, or pucker under the pressure of stitching. Underlay stitches act as a stabilizing layer here, helping to keep the fabric smooth and free from all these problems.
Beyond that, the base evens out the surface, stopping the top stitches from getting lost in the loose weave and ensuring a well-defined, tidy outcome—something a skilled embroidery digitizing service can help manage with precision.
C) 3D Puff Embroidery:
With 3D embroidery, especially in a floral design, the petals are stitched to create a subtle, lifted effect on the fabric. A center run underlay helps each petal stay in place, while an edge walk or zigzag reinforces the edges, giving the top satin stitches a strong surface to rest on.
By placing the base threads correctly, the top layer stays lifted, making the design stand out with a soft, three-dimensional effect. This is where an expert embroidery digitizing service makes all the difference.
D) Metallic and Specialty Threads:
Can you simply overlook the rich accents, bold textures, and modern elegance that shimmering and decorative threads add to embroidery? Whether it’s the shimmering gold on haute couture gowns or the sleek silver accents on designer bags, these decorative fibers scream sophistication. But there’s a downside—they’re delicate. They can fray, break, or simply refuse to work smoothly. A carefully placed backing offers firm support, lowering friction and easing tension.. This prevents metallic and specialty threads from sinking or wearing out, keeping their shimmer and rich finish intact—something that a reliable embroidery digitizing service understands and accounts for.
Essential Tips to Get It Right
A) Choose the correct underlay Stitches:
Always make sure your choice aligns with the fabric and machine embroidery Stitches for smooth, even stitching. A dependable embroidery digitizing service can provide helpful insights based on material type and stitch complexity.
B) Test It Out First:
Before going all in, test the default settings on a small fabric piece to confirm it works smoothly without messing up the design.
C) Keep It Away from the Edges:
Leaving a little space between the underlay and the edges helps avoid visible lines and keeps the design looking sharp.
D) Try a Combo Approach:
When needed, use a combination of techniques for better results. A custom-tailored plan from a trusted embroidery digitizing service can help you get it just right.
In the End:
So basically, underlay stitches are the foundation that keep your machine embroidery designs clean, stable, and sharp. Whether it’s a basic line or a more complex zig-zag stitch underneath, choosing the right type makes all the difference. And if you want your designs to have that perfect start, trust the experts. At Cre8iveSkill, our team of skilled professionals brings years of experience in embroidery digitizing services, making sure every stitch counts. Learn more About Us and see how our team can help elevate your embroidery projects with precision and quality you can rely on.