
Table of Contents
How To Vectorize An Image
Working with graphics in a digital world requires you to familiarize yourself with vector vs. raster conversions. You can confidently navigate the digital art world if you know the intricacies of each of these illustration formats and how they affect your output. A raster-to-vector service converts your image to vector format. What exactly is a vector format? Unlike raster images, which are made up of bits or pixels, vector graphics are made up of geometric designs and mathematical methods.
What Exactly Are Raster Images?
.png)
Raster pictures are made up of individual pixels and include many elements. However, you cannot increase them without sacrificing quality. A vector image is made up of lines and shapes. They are usually considerably less defined, but you may guide them to any size you choose without dropping anything. If you have a raster picture that is too tiny for your needs, the option is to convert the photo to a vector, which you can accomplish with Adobe Illustrator.
What Is A Vector Image Exactly?
.png)
A vector image is a scalable picture created from values rather than pixels. The majority of photos found on the internet are raster images. Raster images produce a photo by using rectangular pixels (bits of color). Vector images employ scalable shading polygons to communicate color.
Because vector photographs employ dynamic shadow sections rather than static squares, they produce excellent strains and clear colors. Vector photos have formulaic geometry, making them decision-unbiased. This implies that images do not lose quality, whether scaled up or down since the color polygons in a vector image keep their form. The same isnt true for raster images because their coloring data are stretched when resized.
You could immediately identify the difference between the two types of photos based on their report structure. Raster pictures are standard photo formats such as JPG and GIF, whereas vector images are often in the SVG, EPS, or AI format. One approach to converting a jpg file to a vector in Adobe Illustrator is to scale whatever you find to the size you want—without losing photo quality.
It is a short and straightforward method that yields remarkable results. Adobe Illustrator makes it simple to convert images to vectors without compromising quality. Here is a step-by-step guide on vectorizing an image.
Heres how to use Adobe Illustrator to convert a photo to a vector. So lets get started on converting a snapshot into a vector.
Step 1: What Is A Vector Image Exactly
.png)
Except for the fact that larger photos may take longer to edit, the image you use may not count when using the following approach. There are some images, but those paintings perform better as vector images than others. It is preferable to alter a single challenge rather than a panorama or something similar. Ideally, the snapshot should have a white or visible background and a definite low decision. It should be in a format like JPG, GIF, or PNG.
Step 2: Select A Picture Suggestion Preset
.png)
Illustrator offers a unique tool that allows you to vectorize pictures. Its called image trace, and it comes with a slew of settings that automate most of the job. Extensively speaking, you must choose the picture to trace preset that most closely reflects the sort of photo you are converting, as each provides unique results. Two of the popular colors photo hint presets are available
• Sun shades of grey photograph hint preset
• Silhouettes photograph trace preset
You have two options: high consistency image and low fidelity image.
These generate extremely unique vector pictures that are significantly less defined. Theyre perfect for photos or sophisticated artwork, such as the example image with three colorings, six colors, and sixteen shades.
These presets generate vector pictures with three, six, or sixteen colors. Theyre perfect for logos or artwork with a lot of flat color and greyscale. This preset creates a detailed grayscale image. This results in a minimal brand with two colors—black and white. It functions similarly to sketched artwork, silhouettes, line art, and technical drawing. These are best suited for one-of-a-kind photographs, producing black and white, largely line-based drawings.
To begin, open Illustrator and choose your picture to activate the photograph options. Those choices must be visible at the top of your Illustrator window. To convert snap photos to vectors in Illustrator, pick your preset by clicking the dropdown arrow next to the picture suggested.
To begin tracing, click on it.
Step 3: Use A Snapshot Trace To Vectorize The Image
Your image will go through the tracing method robotically when you press the button. You may notice some modifications to your image, but the overall look should remain consistent. For example, the following is a close-up of our image before the tracing procedure. A close-up of a pre-vectorized image showing the pixels
Zoom in on the image after vectorization. Even though most of the piece has been removed from the original image, the traced version seems considerably crisper. Youll notice that the color forms no longer pixelate regardless of how close the shot is zoomed in. Zoom out, and the picture should seem the same in reality.
While the upper image may look clearer in some instances, the quality of our vectorized image remains pretty high.
Step 4: Improve The Quality Of Your Traced Image
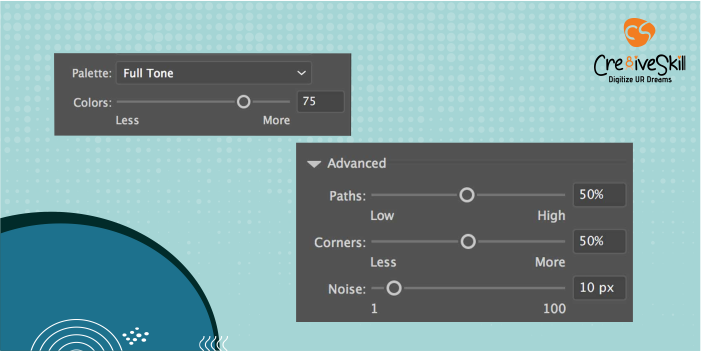
After tracing the image, access the image trace panel from the Window menu to fine-tune the conversion. Change the mode to switch between color, grayscale, and black and white. Drag the colors slider to the left to simplify your vector photo or to the right to add more elements.
If youre satisfied with your settings and wish to reuse them, click the modify presets button next to the presets option. Your preferences may now be saved as a new preset.
Step 5: Separate The Colors
Your image has now been organized into colored shapes corresponding to the original raster image. To complete vectorizing your image, youll must separate these color groups from altering them. To do so, choose your traced photo and click the enlarge option at the top of the window. Select the Make Bigger option.
This will allow you to see the vector pictures composite forms. The shapes are all outlined in blue. Then, right-click on the image and select ungroup from the menu. This may allow you to divide your color shapes into man or woman aspects. When you right-click in the layers panel and select ungroup, youll find that your color agencies have been divided into layers.
Step 6: Make Changes To Your Vector Image
After converting a raster image to a vector image, you have complete freedom to alter the image. Begin by removing any color businesses that you favor.
You may select complete shade corporations by clicking on a form and selecting> equal > fill color. This will choose all groups with the same color as the one selected using your direct choice tool (a). Choosing a vector form right away
Then, on your keyboard, use backspace to erase the forms. If you wish to change or expand a particular color group, you may do so by choosing a layer using the direct selection tool. After youve settled on a layer, use the pen or brush tools to fill in blank areas or add extra colors to your design.
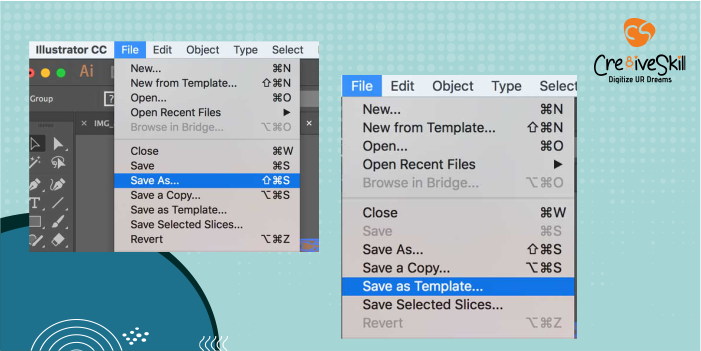
Step 7: Save Your Photograph
Now were ready for the final step for converting photos to vector in Illustrator: storing the photograph in a vector format to preserve its quality. There are several vector image formats to choose from, including PDF, AI, EPS, SVG, and more.
Once youve done editing your image, go to file > export > export as. Within the window, name your document and select SVG from the save as a type selection option. Save the vectorized image as an SVG.
And thats it, guys! Thats how you can convert a photo to a vector in Illustrator. Vectorizing a raster image helps in printing designs on fabrics and digitizing embroidery designs. Vector images should be used for visuals with little detail that may require more detail in the near/far future. Most logos are saved as vector graphics since they are regularly expanded in the future. An essential characteristic of a vector picture is that it can be scaled indefinitely without losing quality. No matter how far you zoom in or how much you scale a vector image, it will stay smooth. The vector artwork has an excellent resolution. After reading this tutorial, you should now understand how to convert raster images to vector images. By following these steps or utilizing the expertise of professionals like Cre8iveSkill, your business can greatly benefit. Remember that complicated vector documents might be much bigger than their raster counterparts. This means they will take longer to load and modify. Nonetheless, your vector image will retain its quality regardless of size.