How To Digitize A Logo for Embroidery- Step By Step Digitizing
Embroidery DigitizingLogo digitization is a process of converting the existing logo or brand icon into a stitch file that can be transferred to a fabric through means of embroidery. The basic principle of digitizing involves the use of the logo in JPG or PNG format so that the machine can understand it and then transfer the same to digitization software for machine embroidery. Now, before actually understanding the step by step digitization process, let us get into understanding the essentials that define and shape the process of logo digitization.
File Formats Accepted By Embroidery Software And Machines
When it comes to digitizing, there are many file types that are readable and accepted by machines. Some of these formats include:
- DST
- EXP
- JEF
- KWK
- DSB
- TAP
Types Of Stitches Used For Machine Embroidery
-
Straight Stitches:
These are stitches for making straight lines and curved shapes with major use in shading, outlining, and detail work. -
Satin Stitches:
These are commonly used for writing the text, designing the logo, or for the borders with a view to give a shiny appearance to the final outcome. -
Fill Stitches:
These are used for filling up the blank spaces in a piece of cloth and majorly put into the process to create a textured look and deliver increased durability.
Types Of Digital Embroidery Used For Commercial Purposes
To apply the logo to any piece of garment, the following types of commercial embroidery are put to use.
- Standard Embroidery: The name itself defines a standardized approach to customizing the process and outcome of logo digitization.
- 3D Puff Embroidery: This type of embroidery for digitization helps achieve a textured element to the logo or emblem of your brand with a dimensional depth and elegant feel.
- Laser Embroidery: This is a layered form of embroidery where the logo place is confirmed and the material is pushed inside the machine so that the laser technology designs the desired pattern without the use of any stitching.
- Patch Embroidery: This form of embroidery is most simple with the fabric being stapled with the logo and then placed on the desired garment using various embroidery designs and patterns.
Step By Step Logo Digitizing Process
Now, when we are aware of the essentials, let us get into understanding the process to digitize a logo for embroidery.
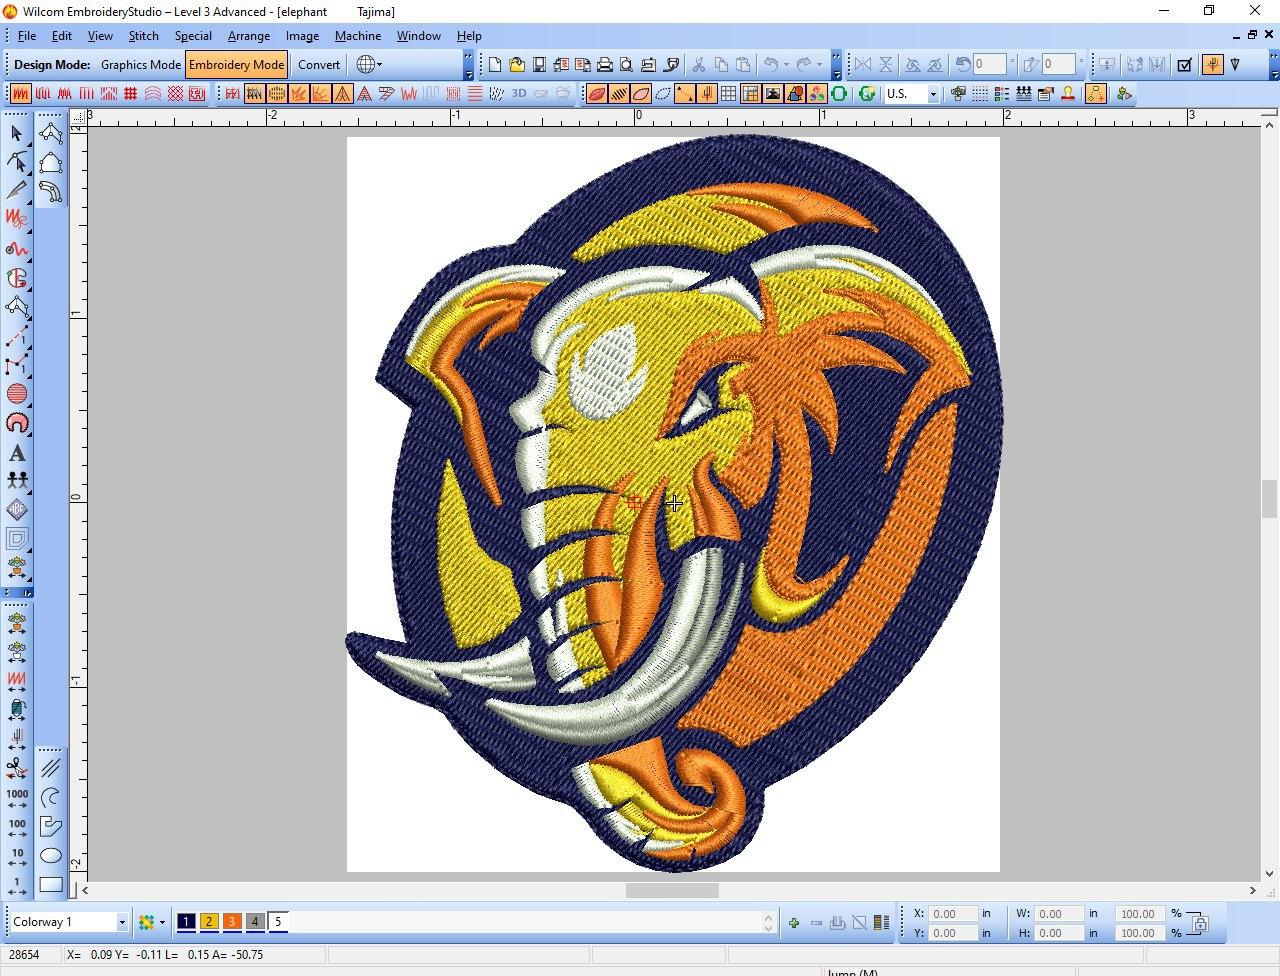
Step 1: The first step is to upload the logo of your brand to the embroidery digitizing software. The uploaded file should be in machine-readable formats like JPG and PNG and then crop the irrelevant spaces to upload the exact requirements to the software.
Step 2: Once you have uploaded the logo, set the dimension of your logo design as you want it to be on your product. This dimension will be the final size of the logo placed on the garment.
Step 3: Now, choose the stitch type like a straight stitch, fill stitch, or satin stitch in response to the kind of stitching you looking to have for your logo. Each type of stitch has its own set of parameters, feel, and length that defines the final appearance of the design.
Step 4: After selecting the type of stitch, the next step is to set the direction of the chosen stitch. This defines in which direction the stitch should be falling on the garment.
Step 5: After all the major parameters are selected, it is time to select the color combination of the threads to be used for logo digitization. The thread colors should fall aligned with the colors on the logo.
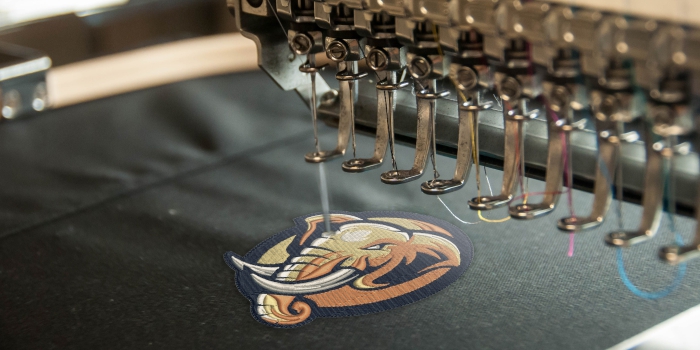
Step 6: Now, the file is ready to get transferred to the embroidery machine using a flashcard, USB cable, or any other means of transferring to the computer running the embroidery digitization software.
Step 7: The next step is to prepare the machine for the process of logo digitizing for embroidery. This step includes deciding on the needles, threads, sequence, and orientation. After setting the guidelines for the machine it is important to position the fabric in the actual loop for embroidery.
Step 8: The last step is to test while embroidering a sample and see how it comes and how does it appear on the fabric. Check for all the pre-mentioned guidelines concerning colors, position, orientation, sequence, stitch, and other design elements.
Step 9: Now, take the final step of creating the logo on the desired piece of fabric while accomplishing the process in the most fruitful manner. Now, the digitized logo is all set to be delivered with the most inspiring look and feel of promoting your brand in an innovative way.
Watch video for Logo digitizing Steps: